Marina and Mata Hari are a pair of one acts by playwright Don Nigro. The one woman Marina is an appropriately poetic and tragic exploration of Russian poetess Marina Tsvetaeva followed by the two person Mata Hari, in which the accused spy and prostitute is visited in prison by her abusive husband on the day of her execution.
The show was presented as part of the Planet Connections Theatre Festivity at the Robert Moss Theater, which, if you are as old as I, you’ll remember as the Musical Theater Works Studio 1. The shows are gorgeous, well directed by Ivette Dumeng and both of the eponymous roles are strongly performed by Tatyana Kot, with Curtis James Nielsen playing MacLeod, Mata Hari’s husband.
This shoot was a last minute affair and full of interesting challenges. I was contacted Friday night to come in and shoot the Saturday matinee, which also happened to be their opening performance! Usually I shoot final dress rehearsals, because there’s no paying audience and therefore the ability to move around without annoying anyone too much. Not so this time. I wound up in the house left corner of the last row. I have to give massive props to Canon for their silent mode. It was really a shoot saver here. I’m much more confident that when I do need to shoot when the audience is present, I can do so without being disruptive.
My next challenge came in the second half, during Mata Hari. While Marina was not brightly lit, as you can see the actress has pale skin and is wearing an ivory slip – exposure was not a problem. I was able to keep my ISO at about 5000, aperture in the 3.5 to 5 range and the shutter speeds in the 100s to 200s. I had to coax some details out of the shadows when processing, but nothing too challenging. Mata Hari, on the other hand… Mata Hari takes place in her prison cell. Dark and dank. Costumes were black and navy (until the very end). I was changing settings like a mad man! I pushed the ISO up and up and pulled shutter speed down, praying that the image stabilization on my 70-200mm f/2.8L IS II would save me. But it was still too close to the edge. I was scared to do it, but I eventually wound up at ISO 10,000. Again, Canon saved the day! The ISO 10K shots on my 5D Mark III were all totally usable. There was some speckling on the black curtain in the background, but I ran luminance noise reduction over them and they cleared right up!
Last, but not least, I recently decided to try Lightroom 5 out and this was the first major shoot I ran through its workflow. I’ve been a Bridge + Photoshop guy for years, but I know a lot of people who adore Lr. Gotta say, I’m hooked already. I’ve got some definite learning to do, but the workflow is much smoother and I was able to stay in Lr for nearly everything (and had I done some more research and setup, I probably could have never left). If only for the massive time savings I had just in flagging and rating shots, it’s worth the move.
So, in conclusion, while the gear doesn’t make the photographer, the gear can get you through some challenging scenarios! 5D Mark III silent mode and high ISO + the image stabilization of the EF 70-200mm f/2.8L IS II USM lens made all the difference on this shoot. Thanks, Canon!
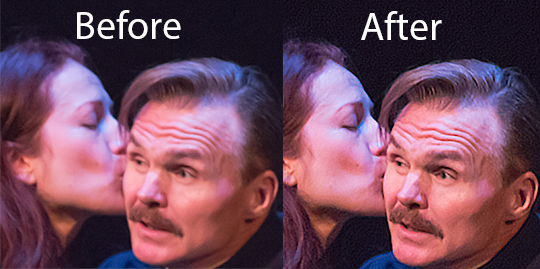
[Update] Since my initial pass through my shots Photoshop CC was released. I decided to run a couple of the keeper shots I had taken at low shutter speeds (1/60 or lower) through their new Shake Reduction filter just for fun. These were shots that were a little soft, but certainly not out of focus. Wow. Wow does not actually begin to describe it. They went from a little soft to tack sharp.
That’s kind of amazing. It takes a while to render (until I get my Darth Mac Pro…), so you wouldn’t want to have to run a whole shoot through it, but for the ones that really matter, what a tool! So Adobe, for Lightroom 5 and Photoshop CC‘s Shake Reduction tool, you get kudos, too!
